I’ve recently been working on a project involving Google Spreadsheets. My goal was to store data in the spreadsheet using a form and then read the data from that spreadsheet using a Node.js application. Having no experience with Google web services, I ended up digging through a lot of documentation only to find that there are no official Node.js examples. So I pieced together the process of accessing data from a Google Spreadsheet and wanted to share so others wouldn’t have to do the same thing.
This post assumes that you already have a Google Spreadsheet and that the spreadsheet is not shared publicly. It also assumes that you do not want to use your Google username and password to access the spreadsheet through a web service. This is possible, but I personally feel better using OAuth.
Step 1: Create a Google Developers Console project
In order to access data from any Google web service, you first need to create a project in Google Developers Console. Name it whatever you would like and then click on it to see more information about the application.
Step 2: Enable the Drive API
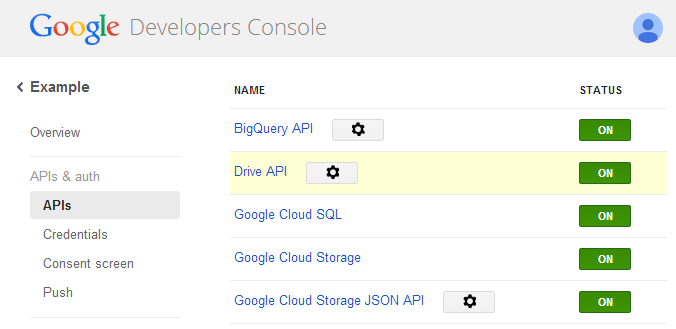
All projects have a set of APIs enabled by default, but the Drive API isn’t one of them. This is the API that lets you access things inside of Google Drive, including spreadsheets.
On the left side, click APIs & auth and then APIs. On the right side, scroll down until you find the Drive API and click the button to enable it.
Step 3: Create a service account
In order to avoid using your personal Google account information to access the API, you’ll need to set up a service account. A service account is a Google account used only to access web services.
On the left menu, click APIs & auth and then Credentials. You’ll see your client ID and the email address representing your application. Don’t worry about those, you don’t need them.
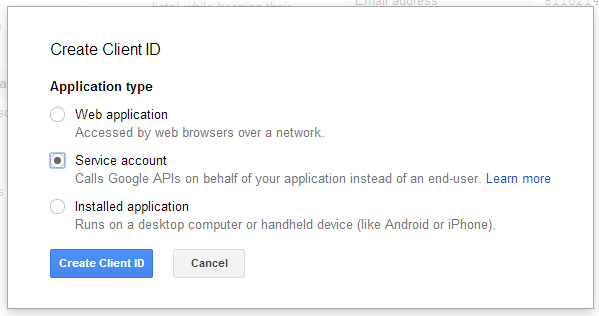
Click Create New Client ID, which will pop up a dialog. Select Service Account and click Create Client ID.
You’ll then see your new information on the page.
Step 4: Generate a key
The service account you created needs a way to authenticate itself with the Drive API. To do that, click Generate a New Key, which is located under the service account information.
The browser will download a private key and you’ll be given the password to use with the key. Make sure to keep this file safe, you won’t able to get another copy if you lose (you’ll just create a new key).
Step 5: Generate a PEM file
In order to use the key in Node.js with the crypto module, the key needs to be in PEM format. To do that, run this command:
openssl pkcs12 -in downloaded-key-file.p12 -out your-key-file.pem -nodesYou’ll be asked for the password that was given to you in the last step.
Step 6: Share your spreadsheet
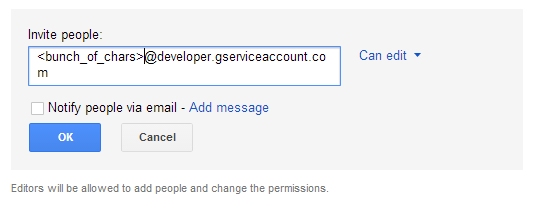
When you created the service account, an email address was created along with it in the format of <bunch_of_chars>@developer.gserviceaccount.com. The email address is important because you need to share your spreadsheet with the service account.
To do so, open the spreadsheet and click the Share button. In the dialog, enter your service account email address and uncheck Notify people via email. You’ll be asked to confirm that it’s okay not to send an email, and of course it is, since that’s just the service account.
You can decide whether you want the service account to have full access to modify the spreadsheet or just view it. As always, it’s best to start with the lowest permission level needed.
Step 7: Setting up your Node.js project
There are a lot of packages on npm relating to Google APIs, but for my use case I chose <a href="https://www.npmjs.org/package/edit-google-spreadsheet">edit-google-spreadsheet</a> due to its excellent documentation and support for multiple authentication methods, including OAuth2. If you just want a library to deal with authentication (assuming you’ll do the web service calls yourself), then take a look at <a href="https://www.npmjs.org/package/google-oauth-jwt">google-oauth-jwt</a>.
Install edit-google-spreadsheet:
npm i edit-google-spreadsheet --saveStep 8: Making the request
The edit-google-spreadsheet module is simple to get started with. Here’s an example that reads the spreadsheet:
var Spreadsheet = require('edit-google-spreadsheet');

Spreadsheet.load({
    debug: true,
    spreadsheetId: '<bunch_of_chars>',
    worksheetName: 'Sheet 1',

    oauth : {
        email: '<bunch_of_chars>@developer.gserviceaccount.com',
        keyFile: 'path/to/your_key.pem'
    }

}, function sheetReady(err, spreadsheet) {

    if (err) {
        throw err;
    }

    spreadsheet.receive(function(err, rows, info) {
        if (err) {
            throw err;
        }

        console.dir(rows);
        console.dir(info);
    });

});
You can specify the spreadsheet to read by using either spreadsheetName or spreadsheetId. I prefer using spreadsheetId, since the name may change at some point. The ID is found in the share URL for the spreadsheet. For example:
https://docs.google.com/spreadsheet/ccc?key=<bunch_of_chars>&usp=sharingThe value for the query string param key is the spreadsheet ID.
You also need to specify which worksheet to read. Unfortunately, the worksheet ID isn’t available in the Google Spreadsheets UI, so you’ll need to at least start by using worksheetName. The worksheet IDs are available in the extra information sent along the spreadsheet data (info in the example).
In this example, I also have the debug flag set, which outputs additional information to the console. Start with it turned on to aid with development, I found it immensely useful.
For more information on how to use edit-google-spreadsheet, please see its README.
Securing the PEM file
Although the example above uses the PEM file directly, it’s important to understand that you should never check private keys into a source code repository. The edit-google-spreadsheet module allows you to specify a string instead of a file path by using the key property. There are many different ways to get the text from the PEM file, but perhaps the easiest is simply to store its contents in an environment variable. For example:
export PEM_KEY="`cat /path/to/your_key.pem`"Then, from inside of your Node.js application, you can read the key from the environment, such as:
var Spreadsheet = require('edit-google-spreadsheet');

Spreadsheet.load({
    debug: true,
    spreadsheetId: '<bunch_of_chars>',
    worksheetName: 'Sheet 1',

    oauth : {
        email: '<bunch_of_chars>@developer.gserviceaccount.com',
        key: process.env.PEM_KEY
    }

}, function sheetReady(err, spreadsheet) {

   // ...

});
The primary benefit of this approach is that you avoid checking the key file into your repository while still allowing its use. You should do the same for the service account email address and any other information that is authentication-related.
The end
With that, you should be able to get an app up and running easily with access to Google Spreadsheet data. I’ve always loved the ability to set up arbitrary forms that store their data in Google Spreadsheets, and now being able to programmatically access that data from Node.js just makes it an even more powerful option.
Update (6-March-2014): Added section on securing your PEM key.